1: Introduction
Login to DSpace (http://dspace.mit.edu.ezproxyberklee.flo.org) by selecting the login link in the “My Account” menu. You will be prompted to use your MIT username and password. Alternatively, you can use Touchstone (Kerberos) to access your DSpace account.
Once you are signed in select the submissions link in the "My Account" menu.

2: Open Access Cataloging
After signing in go to the My Account menu on the far right and click on Submissions.

By clicking Submissions, the button should redirect to the Submissions & Workflow tasks page.

Scroll down in the queue until you find an item that is categorized in the “Final edit/approve step.” Check the box(es) for the item(s) you want to catalog and click “Take selected tasks”

If you selected just one item you will be taken to the item page where you can see a basic metadata overview and download a file version of the article (usually it is the author’s manuscript version submitted to the collection). On the same page you will see a menu for actions you can take.

There are five actions to choose from:
Approve item: Clicking this button will submit the item and corresponding metadata into the Open Access Collection in DSpace making it live (This is usually the final step in the cataloging process unless it is possibly a duplicate).
Reject item: Clicking this button will reject the item and delete it from the task pool. See section 3 for instructions on how to reject an item.
Edit metadata: Clicking this button will take you through a series of pages where you can import metadata, make any necessary edits and verify the accuracy of the metadata.
Send to Acquisitions/Licensing: If there is missing acquisition or licensing information, send the item back to the Acquisitions/Licensing step.
Cancel: Clicking this button will put the item into your own personal task queue but will not return it to the main task pool. This is useful if you need to return to an item at a later time, need to do more research, or need to ask a question about a given item.
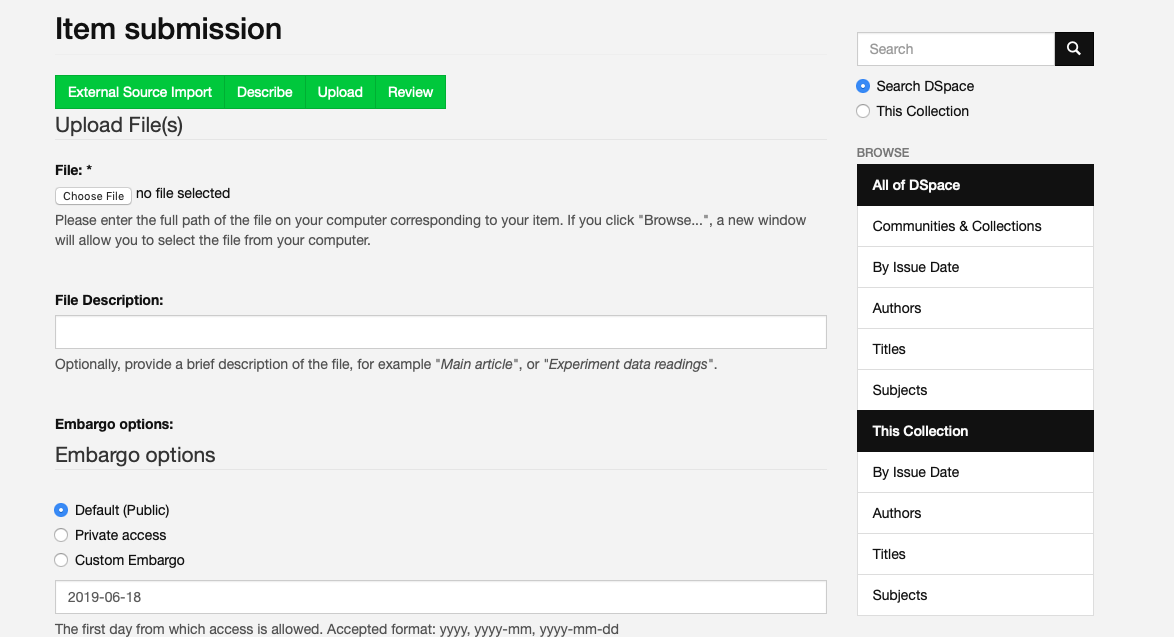
Before editing the item record, make sure to download the article pdf. If there is a mismatch between the attachment and item record, send it back to Acquisitions and Licensing step so the correct pdf. Word document versions of the author’s manuscript are also accepted file types for the repository. Sometimes there are supplemental materials attached to an item record. The supplemental materials are not needed for cataloging an item, just the main attachment.

After clicking “Edit metadata”, check Crossref for article information to import using a partial DOI or article title. Searching by author can sometimes be too broad for the purposes of finding the matching article information to import into the item record.

There is also the option to skip article import. If the article cannot be found using Crossref, simply skip to the next step.
For articles with hundreds of authors (especially physics articles affiliated with CERN, LIGO or other collaborations), importing an article should skipped since importing the author information currently causes DSpace to time out on the task. See Section 2.2.2.4 and 3.1 for specific instructions on how to catalog articles with more than 30 authors.
Search Crossref for article information by entering a partial DOI and clicking search.

2. If the query successfully returns results, select the one that matches the title exactly. Click import.

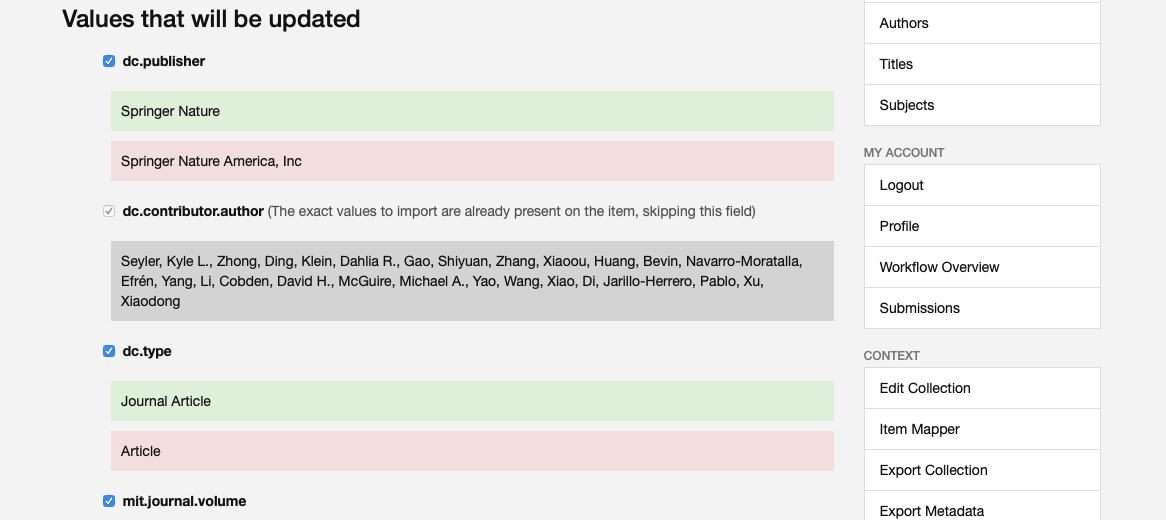
3. Review the imported metadata to verify the correct article information was imported before editing the item record. The newly imported metadata values are highlighted in green. The metadata values that are going to be overwritten are highlighted in red. If the newly imported values exactly match values already in the record, then they are going to be highlighted in gray. You can uncheck fields that you do not want to overwrite with the imported values.

There are several fields that you may need to add information to or edit when you are cataloging an open access publication. Subsections specific to each field provide guidance on how to follow metadata best practices for this collection. In December 2019, the ordered authors field was added as an alternative to the authors field. Specific instructions for when the the ordered authors field is used is included in 3.1 which describes a modified workflow for papers with more than 30 MIT authors.

If the article was submitted by a faculty or staff member, then the name should match the format of the name in the author lookup.
If the article was not submitted by a faculty or staff member, then leave the field blank.

A forthcoming article will not yet have a DOI or URL.
When the DOI is broken you can fix the broken link by typing http://dx.doi.org.ezproxyberklee.flo.org/(DOI number from the publisher's website).
Example of a complete DOI: http://dx.doi.org.ezproxyberklee.flo.org/10.1017/s1537592718001081
Always make sure you are using the DOI that points to the English version of an article if there are multiple DOIs.
- If there is not a DOI available use the URL.

- The MIT DLC lookup uses NACO records (searchable in the LCNAF). DLC is an acronym for Departments, Laboratories, and Centers.
- If a DLC cannot be found using the departmental lookup in DSpace, make sure to contact Emily Crawford (ecrawfor@mit.edu) and Ben Abrahamse (babraham@mit.edu) if you do need to create a record for a DLC.
Check the MIT DLCs (Departments, Laboratories and Centers) listed in the record using the Department Lookup to make sure the form of the name is correct. Additionally when the MIT DLCs are not already listed in an article record, use the Department Lookup.

Once a MIT DLC listed in the article is found using the Department Lookup click the add this department to populate the MIT affiliations field with that value.

Sometimes, as pictured below, there might be a DLC record that includes name variants for a DLC. In that instance select the record as it is the most complete version.

Then click add to finalize adding the MIT DLC.

Enter any MIT DLCs listed in the article and also enter any DLCs that appear in an author's record.
Enter each DLC only once - even when multiple authors are associated with a single DLC.
Exceptions:
The Broad Institute (after July 7, 2009), MIT-Singapore Alliance, and Howard Hughes Medical Institute are not considered MIT Affiliations and should not be entered.
Whitehead Institute, Ragon Institute, and Woods Hole Oceanographic Institute should only be entered if the Authors are also MIT affiliates.
Following the DSpace upgrade in April 2019, the use of a separate MIT authors field was discontinued. Now, all the authors (MIT and non-MIT) are entered into the same section.
- All forms of non-MIT author names are from the articles and MIT author name forms are from central Human Resources data.
When editing the author list, make sure to keep original author order. There are arrow icons next to any added names which allow you to move them up or down.
Although MIT authors may already be in the list, they haven't been verified through the Author Lookup. After finding their names, add them to the list and delete the unverified versions of their names.
Sometimes there is more than one author name for an MIT author in the Author Lookup. Select the most complete author record in the search results; usually the most complete author record is italicized. Ideally an author record for an MIT author should have their last name, first name, MIT id, Orcid and departmental affiliation.
- DOI Provided:
To determine which authors of an item are "MIT Authors" look at the author list on the publisher website or item. Sometimes the item pdf or doc will have the authors listed on the last page instead of the first page.
Author affiliation is often indicated by a number or symbol, following the name, which corresponds to a list of affiliated institutions listed below or at the end of the article.
In some cases authors are listed in groups by their affiliation. Often this information is found on the first page of an item or in a footnote but you may have need to view the end of an article to locate the affiliation information.
To quickly find MIT author information, use CTRL + f to search the pdf or webpage using keywords like "Massachusetts" or the number corresponding to their affiliation with an MIT department, laboratory or center (DLC).
If an MIT author cannot be found in the Author Lookup, their name will need to be checked in the MIT directory (the form of name in the directory is what we are considering the authorized form of the name). Alternatively you can go to a specific DLC website to see if they are part of the staff since they are not always in the MIT directory.
When searching for an author name in the MIT directory do not use the middle initial or middle name (sometimes it is best just to search for the last name).
Enter the names as provided in the directory regardless of the form of the name found in the item.
Enter the name in the following form: Last, First M., Jr.
If the name is not in the MIT directory but the author was affiliated with MIT at the time the article was written then the name should be entered as an MIT Author name. Often there are names of students who have since graduated from the Institute. You may want to search the entire MIT site for the name to double check that an author was a student or faculty at the time when the article was researched/written.
If you are unable to determine if A. Smith is Adam or Alison use only the initial A.
Tip: Sometimes a distinction can be made if the author's email address or DLC is listed on the item.
If there is a name (Green, Daniel) that yields more than one result of an identical or similar name using the author affiliation search in DSpace or the MIT directory then do not assume which one is the author of the article. Instead enter the name as an MIT author exactly as it appears in the article.
Tip: There may be multiple authors with the same or very similar names so check the dates and department information to make sure the correct name is entered
Exceptions for adding someone as an MIT author:
If an author is listed on the item as being part of MIT through the Whitehead Institute, the Ragon Institute, or the Woods Hole Oceanographic Institute but does not show up in the MIT directory, do not enter them as an MIT author. Many Whitehead, Ragon, and Woods Hole employees are also MIT affiliates and will show in the directory.
The MIT-Singapore Alliance and Howard Hughes Medical Institute are not considered MIT affiliate institutions and should not be entered
- Broad Institute: Broad Institute authors will be entered as a MIT Authors only when the published date of a submission is prior to July 1, 2009. Some Broad authors are affiliated with MIT's Biology Department. In that case, enter only the Biology affiliation.
- If an author published a work prior to being affiliated with MIT and there are not any MIT authors in the article being reviewed, the article cannot be accepted into the Open Access Collection. See Section 3 for instructions on how to reject an item
- When the DOI is missing or the import function fails due to the size of the author list, only add the MIT authors.
- If there is a name for a collaborative group (example: LIGO Scientific Collaboration) then add the name of the group to the end of the author list.
- After metadata is imported, delete any non-MIT or MIT author names with incorrect or missing punctuation. Re-enter them with the correct punctuation.
- How to search for an MIT author name using the author lookup:
- Enter the last and first names and click lookup.

- Enter the last and first names and click lookup.
2. A search window should appear with search results. Select the most complete author record for the author associated with the article. Click add this author.

3. Confirm adding the MIT author to the record by clicking add.

Below is a screenshot from a newer record (post-December 2019) that includes the ordered author field. If the author field is being used, you do not have to add information to the ordered author field. Proceed as normal to verify the MIT authors. Make sure to select "No" in the drop down menu for the field labeled 'Use "Ordered Authors instead of separate author entries for Google Scholar"

Confirm the title of article or book chapter by checking that it matches the title of the item being submitted
A title may need to be edited if it contains symbols and subscript/superscripts. Often a symbol-free title can be copied and pasted from the publisher-provided citation. When a symbol-free title cannot be found in the publisher-provided citation, any diacritics, symbols, and scientific notations can be entered by cutting and pasting (visit http://www.fileformat.info/info/unicode/index.htm for unicode characters)
Most characters can be added into the title field with the exception of some superscripts, subscripts and diacritical marks. DSpace does not currently support decimal numbers, percentages, mathematical symbols or letters in superscript and subscript form. Instead they are typed into the title as either [superscript #] or [subscript #].

Enter only if the final published version of the item has a different title than the version being submitted to DSpace.
A title may need to be edited if it contains symbols and subscript/superscripts. Often a symbol-free title can be copied and pasted from the publisher-provided citation. When a symbol-free title cannot be found in the publisher-provided citation, any diacritics, symbols, and scientific notations can be entered by cutting and pasting (visit http://www.fileformat.info/info/unicode/index.htm for unicode characters)
Most characters can be added into the title field with the exception of some superscripts, subscripts and diacritical marks. DSpace does not currently support decimal numbers, percentages, mathematical symbols or letters in superscript and subscript form. Instead they are typed into the title as either [superscript #] or [subscript #].

This field is where the title of the journal is imported or entered. There are several scenarios listed below along with instructions on how to use the journal field in each scenario.
DOI Provided
Confirm the title by checking the publisher page and article pdf.
Do not use articles at the beginning of the journal titles.
DOI Missing or Incorrect
Confirm the title by checking the publisher page and article pdf.
Do not use articles at the beginning of the journal titles.
Enter the name of the journal that has published or will be publishing the item into DSpace.
Article Submitted but not yet Published
Leave the journal field blank if the article has not been accepted yet.
Enter the journal title if the submitted article was accepted and is forthcoming.
Book Chapters
- When cataloging a book chapter add the book title as the journal title.

If the journal volume number information is readily available add it to this field, otherwise leave the field blank.

If the journal issue number information is readily available add it to this field, otherwise leave the field blank.

Use OCLC or Worldcat to find the appropriate form of the publisher name by searching for the journal title if the Publisher field is not populated with a metadata value or has an error in the publisher name. Then enter the name of the publisher in the record.

If a DOI has been provided this field will already be populated with metadata; but it may not be the correct date according to the current OA cataloging rules.
Confirm that the date is correct.
Enter the year and month that the item has or will be published.
Use the online date, if one is provided. If there is not an online date use the print date instead.
- Exception: When an article is revised after the date published, enter the revision date.
- Exception: When an article is revised after the date published, enter the revision date.
If a month is not available, enter only the year.

If a DOI has been provided this field will already be populated with a value; but it may not be the correct date according to the current OA cataloging rules.
Enter the year and month that the item was submitted for publication. This date may not always be available in the pdf or on the publisher page. If a month is not available, enter only the year.
Publishers may provide multiple dates (submission, revision, accepted). Check the Manuscript Version field to see if the item you are cataloging for DSpace is the "Final Published Version." When the item is labeled as the “Final Published Version” enter the revision date, not the original submission date.
If a DOI was provided this field should already be populated with metadata values.
Although several different identifiers can be entered in this field, the ISSNs for print and online version of a publication are preferred.
ISSN is the most common identifier that will be entered. Sometimes ISSN numbers are not available and so the ISBN numbers should be entered if available. If the ISSN numbers are available then do not add the ISBN numbers.
- Do not add the print-on-demand ISSN and/or ISBN.
- When an ISSN is not available, enter the ISBN information for the print and online versions.
- Besides the print and electronic ISSNs or ISBNs no other identifiers should appear in this field.
- When an ISSN is not available, enter the ISBN information for the print and online versions.

- In cases where a record has ISSN or ISBN information but does not have the journal or publication title, OCLC can be very useful. However, querying by journal title when the ISSN or ISBN information isn’t known tends to return too many search results for OCLC to display. Instead go to WorldCat and click on Advanced Search.

To do an advanced search for journal enter the title. Additionally refine by content type (non-fiction), format (journal/magazine) and language (English) to better refine the search. After entering all the information, click Search.
The results should return the most relevant results on the first page. When selecting a journal/magazine record check to the publisher information to confirm it is the one you are looking for. The ISSN information is located in the lower half of the WorldCat record after the holdings location display.

Find the list of sponsors in the pdf or on the publisher page. Sponsors are often listed in the footnotes at the bottom of the first page or in the acknowledgements section at the end of an article. Occasionally the list of sponsors appears before the appendix. Below is a screenshot example of an acknowledgements section in an article.

Enter each sponsor individually as Sponsor Name (number) in the Sponsor field. Include only sponsors only when direct funding is stated or implied for an MIT author. Often initials will accompany the sponsor name and grant/contract/award number information in the article.
When entering the name of sponsors for individual MIT authors or the research project team, use the exact form of the sponsor information as it appears in the publication.


If the number is qualified with "grant," "contract," "award," or other term put it capitalized in the parenthesis with the number (do not use no. or number) Some examples:
National Science Foundation (Award 123-678-SFN)
Department of Energy BES (Award ER46919)
NSF (Grant 122374)
Exceptions:
If there is a joint grant/contract/award number associated with two or more sponsors then enter each sponsor separately followed by the number from the joint funding source.
- Do not add the sponsor if a grant or award number is not given.
Only enter an individual as a sponsor when their name appears in the acknowledgements along with a gift number.
If the item is a correction for a published article only list the grant and funding information if it appears on the correction.
Sponsors are not added for a specific procedure, machine or facility.
- Treat fellowships as awards.
If subject fields (precedes the abstract field) are populated, delete the metadata from those fields. Below is an example of how to delete entries in the subject field.


Abstract Available
Cut and paste the abstract from the publisher page. If it the abstract is not on the publisher page then cut and paste the abstract from the item. Sometimes a publisher will have a summary/synopsis; if an abstract is not available use the summary/synopsis. We currently do not add visual abstracts to the item records in DSpace.
Abstracts containing formulas and symbols may need editing. The abstract may need to be edited if it contains diacritics, symbols, or scientific notation. Make sure to add all necessary diacritics, symbols, etc. to the text in the abstract.
No Abstract
If there is not an abstract on the item or provided by the publisher then copy and paste the first paragraph of text from the item.
If it is a book review or letter to the editor, create an abstract (review of book title, or letter concerning _________).
Book Chapters
Leave the abstract field empty.
Automatic Deposits
- When the article is an automatic deposit sometimes the abstract is already in the Abstract field. Make sure to check the field to determine if the data is correct.
- The abstract may need to be edited if it contains diacritics, symbols, or scientific notation. Make sure to add all necessary diacritics, symbols, etc. to the text in the abstract.
This field should already be populated with some citation information. However, if a citation is not in the field, look for it on the publisher website to see if they have provided one.
If the publisher website does not have a citation to copy and paste into the citation field, an original citation will need to be created. Below are instructions and examples for citations for common sources.
General
Use a modified MLA citation style for all citations in Open Access Article Collection. A useful resource for MLA citation style guidelines is the Purdue OWL (https://owl.english.purdue.edu/owl/resource/747/01/).
Always double check to make the citation is in the modified MLA format.
For articles or book chapters with three or more authors use et al after the name of first author.
If there are not page numbers use the article number instead in the citation.
Example:
Genova, Antonio et al. “Solar System Expansion and Strong Equivalence Principle as Seen by the NASA MESSENGER Mission.” Nature Communications 9, 1 (January 2018): 289 © 2018 The Author(s)
DOI Provided
This field should already be populated with metadata and the data will need to be reviewed to ensure it is correct. Leave the citation in the style it was created by the publisher.
Add © [year of publication 20XX] Publisher to the end of all citations in which we are cataloging the "Final Published Version" of an article. If the author(s) maintain the copyrights add © [year of publication 20XX] The Author(s)
DOI Missing or Incorrect
There are several ways to enter the citation:
Cutting and pasting citation from publisher page
Downloading citation into Zotero or other citation management program and creating an MLA citation for the item
Creating the MLA citation yourself if (1) a citation is not provided by the publisher or (2) the item is forthcoming but not yet published. Refer to Purdue Online Writing Lab (OWL) website for guidance on how to create an MLA citation (https://owl.english.purdue.edu/owl/resource/747/01/).
Review the citation for spacing issues and accuracy. Delete the DOI from the Citation and any downloaded date provided by a citation management program.
Add © [year of publication 20XX] Publisher to the end of all citations in which we are cataloging the "Final Published Version" of an article. If the author(s) maintain the copyrights add © [year of publication 20XX] The Author(s)
Forthcoming Publications
If the article has been accepted by a journal and will be published in the future: Build a citation based on the information provided by the submitter, using “Forthcoming in:” prior to the journal name to highlight the fact that the article is not yet published. Name, "Article Title," Forthcoming in: Journal Title
If no known publication is forthcoming, leave the citation field blank
Conference Papers
Published conference presentations or papers should be cited in one of the following formats:
Last Name, First Name. “Conference Paper Title.” Conference Title that Includes Conference Date and Location, edited by Conference Editor(s), Publisher, Date of Publication.
or
Last Name, First Name. "Conference Paper Title." Conference Title that Does Not Include Conference Date and Location, Conference Date, Conference Location, edited by Conference Editor(s) Publisher, Date of Publication.
Example: Alistarh, Dan et al. "Time-space trade-offs in population protocols." Proceedings of the Twenty-Eighth Annual ACM-SIAM Symposium on Discrete Algorithms (SODA '17), January 2017, Barcelona, Spain, edited by Philip N. Klein,Society for Industrial and Applied Mathematics (SIAM), 2017
Book Chapters
Book chapters should be cited in the following format:
Last Name, First Name. "Book Chapter Title." Book Title. edited by Book Editors, Publisher, Date of Publication: Page Range.
Example: Keller, Evelyn Fox. "Pot-holes Everywhere: How (not) to Read my Biography of Barbara McClintock." Writing about Lives in Science, edited by Vita Fortunati and Elena Agazzi, V&R Unipress, 2014: 33-42 © 2018 Vandenhoeck & Ruprecht
Add © [year of publication 20XX] Publisher to the end of the citation if we are cataloging the "Final Published Version" of the book chapter. If the author(s) maintain the copyrights add © [year of publication 20XX] The Author(s)
When finished entering the metadata for a given item click next at the bottom of the page. You will then be taken a page where you can review the attachments. Remove or add files as needed. Make sure to indicate which file is the primary file.

Check the item record to be sure that the needed metadata has been entered correctly and in the correct fields. If you notice an error click Correct one of these and you will be taken to back to a section of the record for editing.


- When you are finished reviewing the record, click complete submission to close the record and archive it.
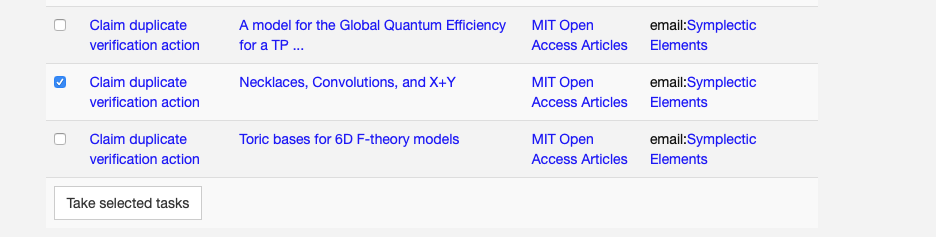
- Check to see if it in the task pool labeled as a Claim Duplicate Verification Action item. If it is, check the box next to it and claim the task by clicking Take selected tasks.
- Click Take task.

- After being redirected to the duplicate check page, you will see a the item and a list of potential duplicates. If it is not a duplicate click Not a duplicate and if it is a duplicate click Flag as duplicate.

3: Modified workflows
In cases where there are more than 30 MIT authors and/or more than 100+ non-MIT authors for an item, the ordered author field should be used.
After importing the article, on the "Preview of updated metadata" page scroll down to the dc.contributor.author field. Before proceeding to the record from this page, select and copy the ordered author names from this field. The dc.contributor.author field maps to the Author field, which is not what we want to use.

After copying the metadata from this field check the box next to it and then proceed to the next page.

The next page is the item record and beneath the Author field there should the Ordered Author field; if it is not already populated with the ordered author list paste the ordered author information into it. Then in the dropdown menu for the field labeled 'Use "Ordered Authors" instead of separate author entries for google scholar select "Yes."

If the MIT authors affiliated with the paper are 30 or less, then only add and verify their names in the Author field. For more than 30 authors do not use the author lookup to verify and add MIT authors to the Author field.
4: Instructions for exceptional scenarios
Sometimes an item will be erroneously deposited. The most common reason for rejecting an item is none of the authors are associated with an MIT DLC. If none of the authors are affiliated with MIT at the time of the publication date, you should reject the item from submission to the Open Access collection.
- Compare the author information in DSpace and on the article pdf or publisher website prior to beginning the process of cataloging so you can reject an item right away if there is not any affiliation with MIT.


- When you find an article where none of the authors are affiliated with MIT, click Reject item.

- DSpace will then prompt you to provide a reason for rejecting the item. Type a brief description of 1-2 sentences for why the item was rejected in the box provided. Click Reject item.

If there is missing acquisition or licensing information, send the item back to the Acquisitions/Licensing step. Another instance in which an item should be sent back to the Acquitions/Licensing step is if the pdf or other file type will not download or is not viewable in the web browser. To send it back click the Acquisition & Licensing step in the menu.
Completed A&L fields on a record look like this:

As you can see the person responsible for entering the A&L metadata filled in the fields for manuscript version, peer-reviewed status, type and eprint type. Do not edit these fields. Likewise do not edit any embargo information on the upload files page of a record.
Return task to pool: Clicking this button will return an item to the main task pool.
