...
Create an accession record for the digital material that you are working with, for now it will just be a brief record so that you have an accession number to use with the resulting digital package. This will be one accession for all of the media contained in an unprocessed portion of a collection or a new unaccessioned transfer. If it is part of an unaccessioned transfer with analog records, everything will be accessioned together.
Follow the steps in the Creating Accession Records in ArchivesSpace [link] document manual. This accession record will be updated as you go through this workflow, at this point it is important to have an accession number which you can use for folder naming purposes.
Once you have your stub accession record, create a folder in the shared folder and title it with the accession number with an underscore instead of a dash and acc at the end, for instance: 2020_029acc. If accessible in BitCurator (sometimes won’t show up) or using Windows, the folder can be created either C:\ArchProcessing or on the FRED, C:\Users\DSLabAdmin\ArchProcessing. If not accessible on BitCurator, you can use an external hard drive.
...
Connecting drives and devices
...
- Jaz disk drives
- Optical disc drives
- Memory card readers
- Data tape drives
- Hard drives and storage devices
- Computers
We have an external Iomega 750 zip drive which can read Zip 100, 250, and 750 disks.
Connect the drive’s USB connector to the writeblocker and then connect the writeblocker to the processing computer. (see below under Hard drives and storage devices for instructions) If the drive is not recognized, attempt to connect it without the writeblocker.
Plug the DC cable into the back of the drive and the two prong plug into a standard wall outlet.
Insert the Zip disk with the metal shutter entering the drive first and the side of the disk with the circle facing down.
Proceed to the Imaging section for how to transfer the actual files.
Jaz disk drives
We have a SCSI connected Iomega Jaz drive but have not set it up for use. Contact the digital archivist if you encounter any Jaz disks believed to be of high value.
Optical disc drives
Our processing computers have an optical disk drive for CDs and DVDs. If you are using a different computer without an optical disc drive, use the USB connected disc drive.
If using the USB connected disc drive, plug it into your computer (the remaining steps are the same for either drive).
Press the small rectangular button on the front of the drive and it should pop open.
Place the disk label-side up on the tray, matching it up with the circular part of the tray.
Close the tray until you hear it click shut.
Proceed to the Imaging section for how to transfer the actual files.
Memory card readers
We have a multi-card reader that has a number of slots for memory cards.
Plug the USB connector into the write blocker and the write blocker into the processing computer’s USB port. See below for instructions.
Identify the type of memory card and insert it into the correct slot.
Proceed to the imaging or transferring materials section for how to transfer the actual files.
Hard drives and storage devices
The sections below should cover the most-commonly encountered hard drives and storage devices. We have adapters for some other types listed below, contact the digital archivist if what you need does not appear on this list.
USB
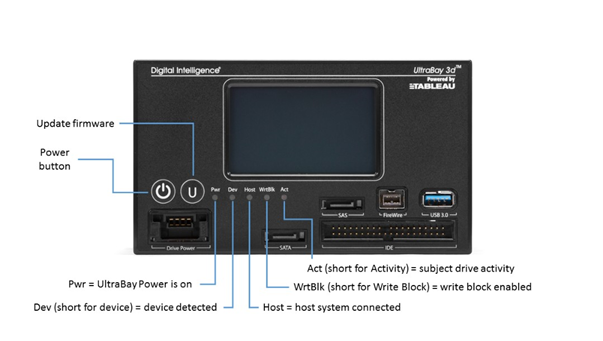
Option 1: FRED UltraBay 3d write blocker
The FRED UltraBay 3d is your first choice for USB hard drives as it has the fastest USB connection (USB 3.0) of any of write-blockers.
Option 2: Tableau write-blocker
The Tableau write blocker is your second choice because it uses a slower USB interface (USB 2.0 than the write blocker on the FRED).
Find the Tableau write-blocker.
Connect the power connector (5 pin din connector) to the write blocker making sure you orient it correctly (the flat part should be facing up. Plug the other end into the wall outlet.
Connect the mini-USB into the write blocker and the standard USB into the processing computer.
Plug in the USB cable from the hard drive into the USB port on the write blocker.
Press the power button the write blocker (the circle with the line through the center).
The drive should now be recognized on the processing computer.
Proceed to the imaging or transferring files section.


IDE hard drives
IDE hard drives are generally older and connect via an IDE connection. They require a different type of write blocker to connect to the processing computer than a USB drive, although the same one as the SATA drive.
Option 1: FRED UltraBay 3d write blocker
The FRED UltraBay 3d is your first choice for IDE hard drives it is on the more powerful computer.
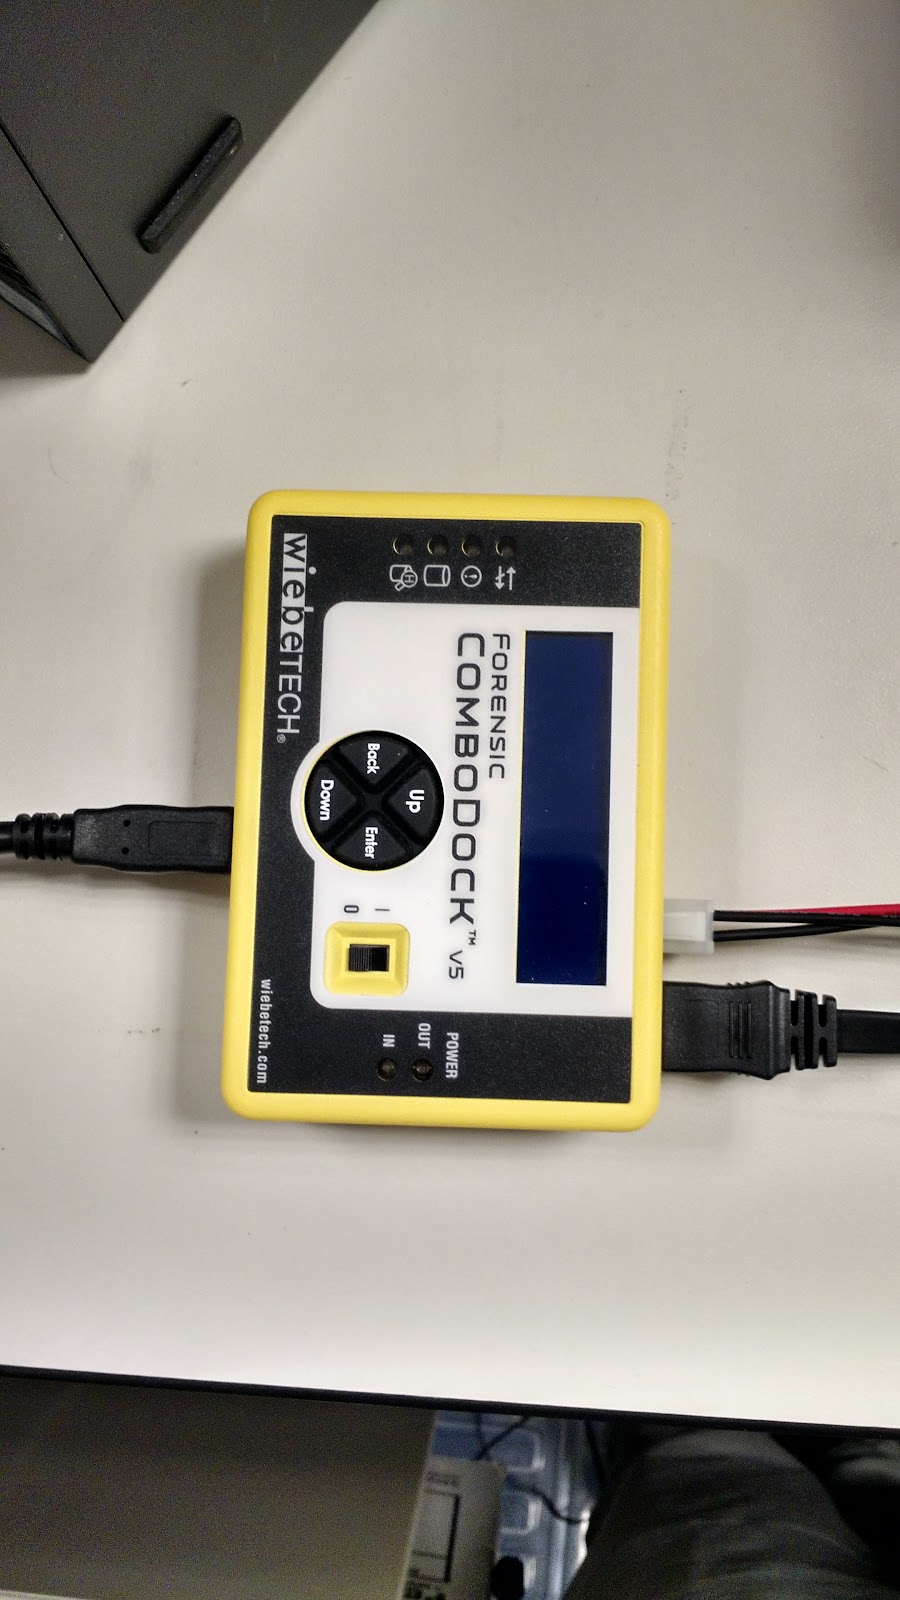
Option 2: Wiebetech write blocker
The Wiebetech write blocker is your second choice as it is on a less powerful computer.
Find the Wiebetech write blocker.
Before connecting the drive, make sure it is jumpered as a “master” device. You can often find the different configurations on the top of the hard drive or through searching online by the type and brand of hard drive.
Attach the 4-pin molex cord to the 4-pin molex outlet on the back of the hard drive.
Connect the other end of the cord (ATX power cord) into the square “Power Out” port on the write blocker.
Put one end of the 40-pin IDE cable into the write blocker. The pink pin 1 line on the cable will be on the left. There is also a notch on the bottom of the cable plastic connector which will guide you to putting it in the correct way.

Put the other end of cord with the flap on it with the pink pin 1 line on the cord so it’s on the left when facing the back of the drive. There is also a notch on the bottom of the cable which will guide you to putting it in the correct way.
Plug the USB 3.0 cord into the write blocker and the other end into the processing computer.

Plug the DC power cord into a power outlet and the other end (circular jack-like power plug) into the write blocker.
Flip the power switch on the top of the write blocker.

On the on-screen menu, select “SELECT MODE: WRITE-BLOCKED” will appear, you should then press the enter button on the keypad. If write blocked is not the mode that appears on the screen, use the up and down buttons to move to that mode and press the enter button.
The drive should now be recognized on the processing computer.
Proceed to the appropriate Imaging section.
SATA hard drives
SATA hard drives are still a standard connection used on many internal hard drives. They require a different type of writing blocker than a USB device, although the same one as the IDE hard drive.
Find the Wiebetech write blocker.
Put one end into the SATA cable into the drive and the other end into the write blocker in the “SATA drive” port.

Connect the other end of the cord (ATX white power plug) into the square “Power Out” port on the write blocker.
Plug the USB 3.0 cord into the write blocker and the other end into the processing computer.
Plug the DC power cord into a power outlet and the other end (circular jack-like power plug) into the write blocker.
Flip the power switch on the top of the write blocker from 0 to 1.
On the on-screen menu, select “SELECT MODE: WRITE-BLOCKED” will appear, you should then press the enter button on the keypad. If write blocked is not the mode that appears on the screen, use the up and down buttons to move to that mode and press the enter button.
The drive should now be recognized on the processing computer.
Proceed to the imaging or transferring files section.

Computers
If you encounter an entire computer or laptop, consider consulting with the digital archivist about your best course of action. There are a few options:
If the computer could connect to the internet and is a modern operating system, install the appropriate software on the computer in question and follow the imaging section below.
Remove the hard drive from the computer and connect it to a processing computer, following the steps above for the relevant hard drive above.
Turn the computer on and connect it via its external ports to the processing computer and transfer the files following the appropriate imaging section below. Some computers have a specific transfer mode, such as Target Disk Mode for Macs.