...
- Floppy drives
- Zip disk drives
- Jaz disk drives
- Optical disc drives
- Memory card readers
- Hard drives and storage devices
...
USB
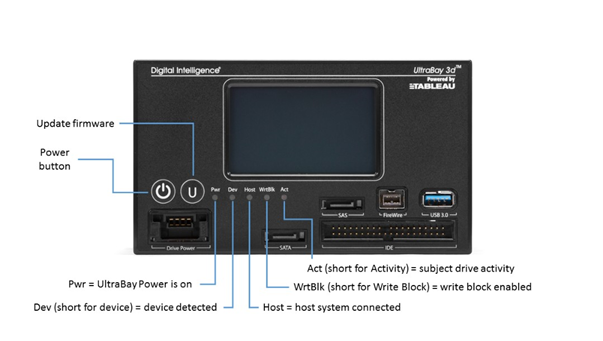
Option 1: FRED UltraBay 3d write blocker
The FRED UltraBay 3d is your first choice for USB hard drives as it has the fastest USB connection (USB 3.0) of any of write-blockers.
Option 2: Tableau write-blocker
The Tableau write blocker is your second choice because it uses a slower USB interface (USB 2.0 than the write blocker on the FRED).
Find the Tableau write-blocker.
Connect the power connector (5 pin din connector) to the write blocker making sure you orient it correctly (the flat part should be facing up. Plug the other end into the wall outlet.
Connect the mini-USB into the write blocker and the standard USB into the processing computer.
Plug in the USB cable from the hard drive into the USB port on the write blocker.
Press the power button the write blocker (the circle with the line through the center).
The drive should now be recognized on the processing computer.
Proceed to the imaging or transferring files section.


IDE hard drives
IDE hard drives are generally older and connect via an IDE connection. They require a different type of write blocker to connect to the processing computer than a USB drive, although the same one as the SATA drive.
Option 1: FRED UltraBay 3d write blocker
The FRED UltraBay 3d is your first choice for IDE hard drives it is on the more powerful computer.
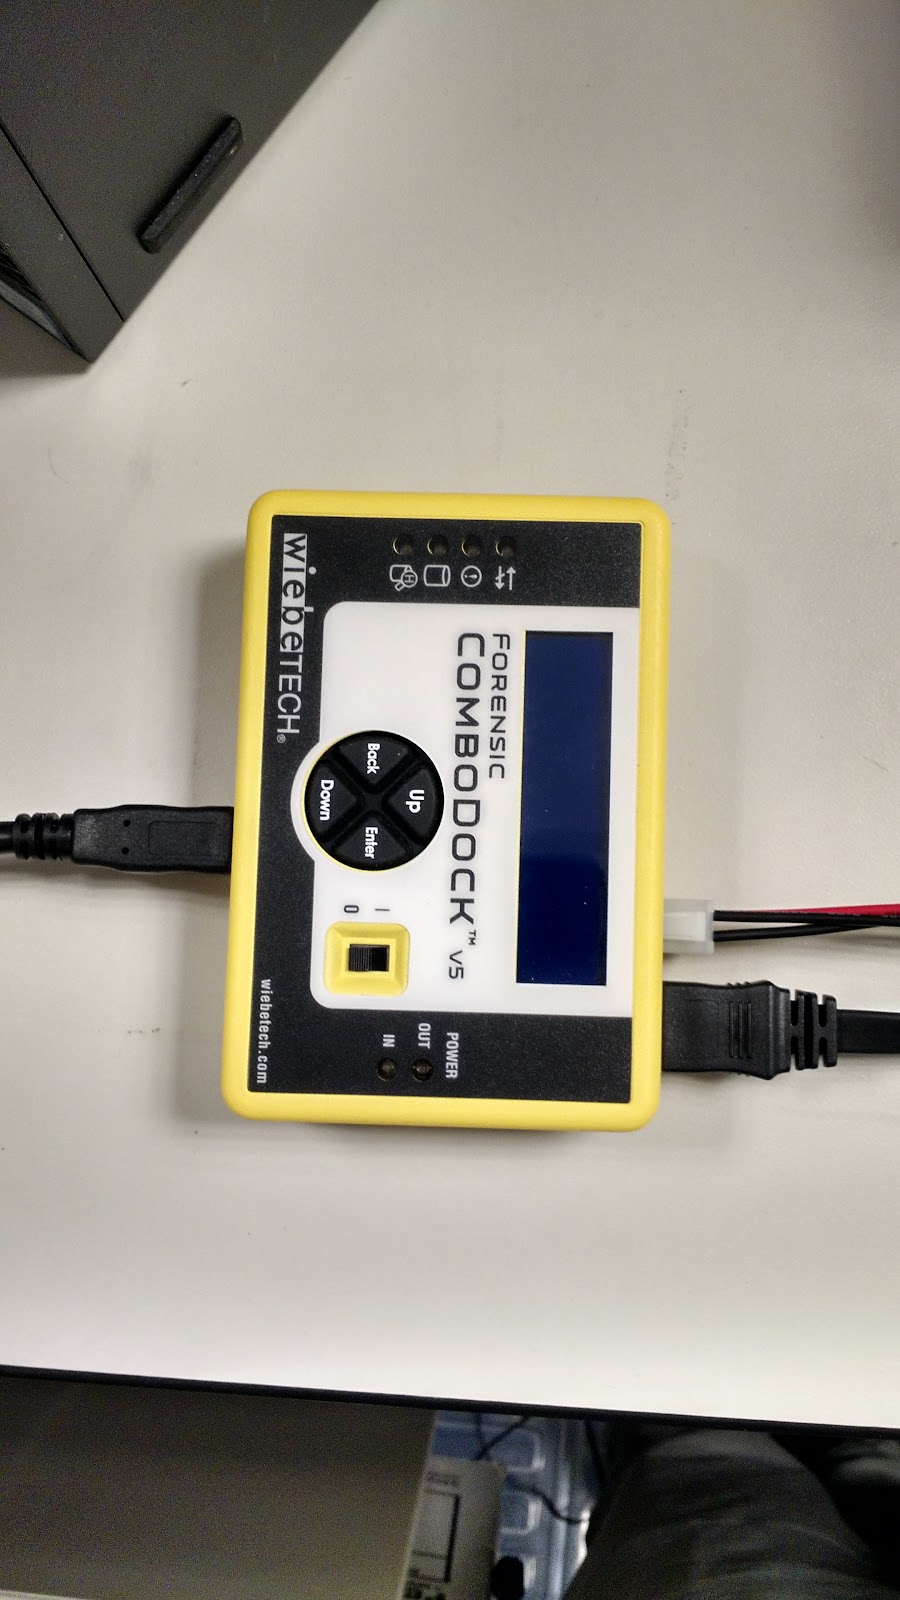
Option 2: Wiebetech write blocker
The Wiebetech write blocker is your second choice as it is on a less powerful computer.
Find the Wiebetech write blocker.
Before connecting the drive, make sure it is jumpered as a “master” device. You can often find the different configurations on the top of the hard drive or through searching online by the type and brand of hard drive.
Attach the 4-pin molex cord to the 4-pin molex outlet on the back of the hard drive.
Connect the other end of the cord (ATX power cord) into the square “Power Out” port on the write blocker.
Put one end of the 40-pin IDE cable into the write blocker. The pink pin 1 line on the cable will be on the left. There is also a notch on the bottom of the cable plastic connector which will guide you to putting it in the correct way.

Put the other end of cord with the flap on it with the pink pin 1 line on the cord so it’s on the left when facing the back of the drive. There is also a notch on the bottom of the cable which will guide you to putting it in the correct way.
Plug the USB 3.0 cord into the write blocker and the other end into the processing computer.
...
...
Plug the DC power cord into a power outlet and the other end (circular jack-like power plug) into the write blocker.
Flip the power switch on the top of the write blocker.

On the on-screen menu, select “SELECT MODE: WRITE-BLOCKED” will appear, you should then press the enter button on the keypad. If write blocked is not the mode that appears on the screen, use the up and down buttons to move to that mode and press the enter button.
The drive should now be recognized on the processing computer.
Proceed to the appropriate Imaging section.
SATA hard drives
SATA hard drives are still a standard connection used on many internal hard drives. They require a different type of writing blocker than a USB device, although the same one as the IDE hard drive.
Find the Wiebetech write blocker.
Put one end into the SATA cable into the drive and the other end into the write blocker in the “SATA drive” port.

Connect the other end of the cord (ATX white power plug) into the square “Power Out” port on the write blocker.
Plug the USB 3.0 cord into the write blocker and the other end into the processing computer.
...
Plug the DC power cord into a power outlet and the other end (circular jack-like power plug) into the write blocker.

...
Flip the power switch on the top of the write blocker from 0 to 1.
...
On the on-screen menu, select “SELECT MODE: WRITE-BLOCKED” will appear, you should then press the enter button on the keypad. If write blocked is not the mode that appears on the screen, use the up and down buttons to move to that mode and press the enter button.
...
The drive should now be recognized on the processing computer.
...
Computers
If you encounter an entire computer or laptop, consider consulting with the digital archivist about your best course of action. There are a few options:
...