| Expand |
|---|
|
1: Introduction 1.1 Getting Started 1.2 Open Access Cataloging Toolbox 1.3 Overview of OA Cataloging Steps 1.4 Reporting issues with DSpace 2: Open Access Cataloging 2.1 Claiming a task 2.2 Editing the item record 2.2.1 Importing metadata 2.2.2 Adding or editing metadata 2.2.2.1 Authorizing MIT Author 2.2.2.2 Published DOI or URL 2.2.2.3 MIT Affiliations 2.2.2.4 Authors 2.2.2.5 Title 2.2.2.6 Title (as published) 2.2.2.7 Journal 2.2.2.8 Journal Volume 2.2.2.9 Journal Issue 2.2.2.10 Publisher 2.2.2.11 Publication Date (as published) 2.2.2.12 Date Submitted for Publication 2.2.2.13 Identifiers (other) 2.2.2.14 Sponsor 2.2.2.15 Abstract 2.2.2.16 Citation 2.2.3 Final Steps 3: Rejecting an Item 4: Returning an item to the task pool |
1: Introduction
| Expand |
|---|
|
Login to DSpace (http://dspace.mit.edu.ezproxyberklee.flo.org) by selecting the login link in the “My Account” menu. You will be prompted to use your MIT username and password. Alternatively, you can use Touchstone (Kerberos) to access your DSpace account. Once you are signed in select the submissions link in the "My Account" menu.

|
...
| Expand |
|---|
| title | 2.2 Editing the item record |
|---|
|
Before editing the item record, make sure to download the article pdf. If there is a mismatch between the attachment and item record, send it back to Acquisitions and Licensing step so the correct pdf. Word document versions of the author’s manuscript are also accepted file types for the repository. Sometimes there are supplemental materials attached to an item record. The supplemental materials are not needed for cataloging an item, just the main attachment. 
| Expand |
|---|
| title | 2.2.1 Importing metadata |
|---|
| After clicking “Edit metadata”, check Crossref for article information to import using a partial DOI or article title. Searching by author can sometimes be too broad for the purposes of finding the matching article information to import into the item record. 
There is also the option to skip article import. If the article cannot be found using Crossref, simply skip to the next step.
For articles with hundreds of authors (especially physics articles affiliated with CERN, LIGO or other collaborations), importing an article should skipped since importing the author information currently causes DSpace to time out on the task. See Section 2.2.2.4 for specific instructions on how to catalog articles with hundreds of authors Search Crossref for article information by entering a partial DOI and clicking search.

2. If the query successfully returns results, select the one that matches the title exactly. Click import.

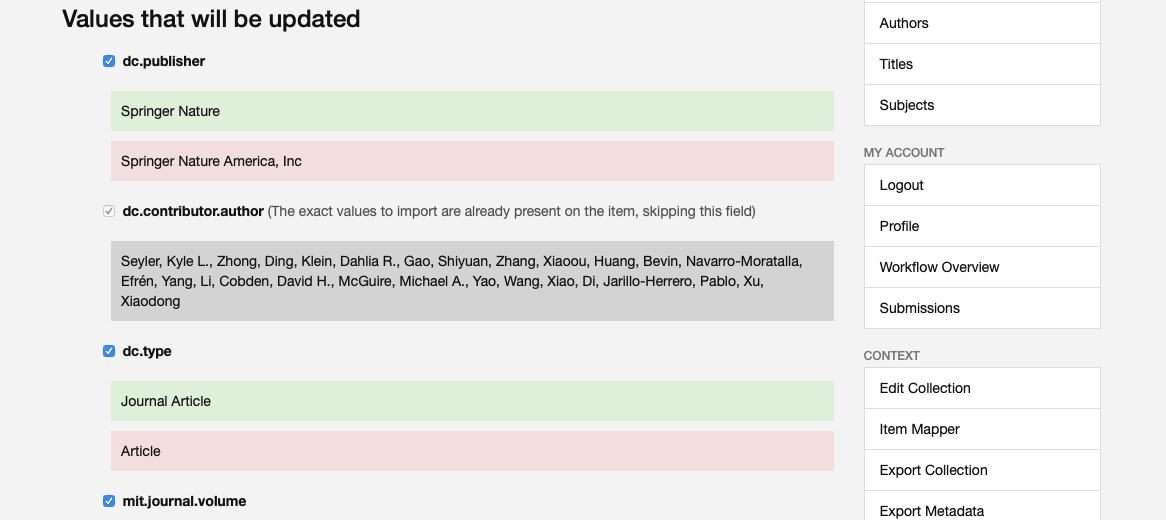
3. Review the imported metadata to verify the correct article information was imported before editing the item record. The newly imported metadata values are highlighted in green. The metadata values that are going to be overwritten are highlighted in red. If the newly imported values exactly match values already in the record, then they are going to be highlighted in gray. You can uncheck fields that you do not want to overwrite with the imported values. 
|
| Expand |
|---|
| title | 2.2.2 Adding or editing metadata |
|---|
| There are 15 fields that you may need to add information to or edit when you are cataloging an open access publication. Subsections specific to each field provide guidance on how to follow metadata best practices for this collection. Since the DSpace upgrade in April 2019, the ordered authors field has been eliminated. 
| Expand |
|---|
| title | 2.2.2.1 Authorizing MIT Author |
|---|
| If the article was submitted by a faculty or staff member, then the name should match the format of the name in the author lookup. If the article was not submitted by a faculty or staff member, then leave the field blank. 
|
| Expand |
|---|
| title | 2.2.2.3 MIT Affiliations |
|---|
| |
|
|
2.2.2.3 MIT Affiliations
Check the MIT DLCs (Departments, Laboratories and Centers) listed in the record using the Department Lookup to make sure the form of the name is correct. Additionally when the MIT DLCs are not already listed in an article record, use the Department Lookup.  Image Modified Image Modified
Once a MIT DLC listed in the article is found using the Department Lookup click the add this department to populate the MIT affiliations field with that value. Image Modified Image Modified
Sometimes, as pictured below, there might be a DLC record that includes name variants for a DLC. In that instance select the record as it is the most complete version.  Image Added Image Added
|
|
|
...
Then click add to finalize adding the MIT DLC.
 Image Modified Image Modified
Enter any MIT DLCs listed in the article and also enter any DLCs that appear in an author's record. Enter each DLC only once - even when multiple authors are associated with a single DLC. Exceptions:
The Broad Institute (after July 7, 2009), MIT-Singapore Alliance, and Howard Hughes Medical Institute are not considered MIT Affiliations and should not be entered. Whitehead Institute, Ragon Institute, and Woods Hole Oceanographic Institute should only be entered if the Authors are also MIT affiliates.
Search OCLC or LCNAF to find the authorized form of the MIT DLC if it is not listed in the departmental lookup. If the authorized name cannot be found using the Department Lookup in DSpace, OCLC or LCNAF then you will need to create an authorized version of the name using RDA guidelines (Chapter 11, Section 2, http://access.rdatoolkit.org/). Then click add. |
| Expand |
|---|
| Following the DSpace upgrade in April 2019, the use of a separate MIT authors field was discontinued. Now, all the authors (MIT and non-MIT) are entered into the same section. When editing the author list, make sure to keep original author order. There are arrow icons next to any added names which allow you to move them up or down. Although MIT authors may already be in the list, they haven't been verified through the Author Lookup. After finding their names, add them to the list and delete the unverified versions of their names. Sometimes there is more than one author name for an MIT author in the Author Lookup. Select the most complete author record in the search results; usually the most complete author record is italicized. Ideally an author record for an MIT author should have their last name, first name, MIT id, Orcid id and departmental affiliation. - DOI Provided:
To determine which authors of an item are "MIT Authors" look at the author list on the publisher website or item. Sometimes the item pdf or doc will have the authors listed on the last page instead of the first page. Author affiliation is often indicated by a number or symbol, following the name, which corresponds to a list of affiliated institutions listed below or at the end of the article. In some cases authors are listed in groups by their affiliation. Often this information is found on the first page of an item or in a footnote but you may have need to view the end of an article to locate the affiliation information. To quickly find MIT author information, use CTRL + f to search the pdf or webpage using keywords like "Massachusetts" or the number corresponding to their affiliation with an MIT department, laboratory or center (DLC).
If an MIT author cannot be found in the Author Lookup, their name will need to be checked in the MIT directory (the form of name in the directory is what we are considering the authorized form of the name). Alternatively you can go to a specific DLC website to see if they are part of the staff since they are not always in the MIT directory. Enter the names as provided in the directory regardless of the form of the name found in the item. Enter the name in the following form: Last, First M., Jr. Remove all accents from the names (MIT and non-MIT) and replace with appropriate unaccented letter(s) since DSpace does not currently support these characters Examples: ç should be changed to c if French, ch if Turkish and ts if Romanian č should be changed to ch ä should be changed to ae ö should be changed to oe ü should be changed to ue ñ should be changed to n
If the name is not in the MIT directory but the author was affiliated with MIT at the time the article was written then the name should be entered as an MIT Author name. Often there are names of students who have since graduated from the Institute. You may want to search the entire MIT site for the name to double check that an author was a student or faculty at the time when the article was researched/written. If you are unable to determine if A. Smith is Adam or Alison use only the initial A. If there is a name (Green, Daniel) that yields more than one result of an identical or similar name using the author affiliation search in DSpace or the MIT directory then do not assume which one is the author of the article. Instead enter the name as an MIT author exactly as it appears in the article.
If an author is listed on the item as being part of MIT through the Whitehead Institute, the Ragon Institute, or the Woods Hole Oceanographic Institute but does not show up in the MIT directory, do not enter them as an MIT author. Many Whitehead, Ragon, and Woods Hole employees are also MIT affiliates and will show in the directory. The MIT-Singapore Alliance and Howard Hughes Medical Institute are not considered MIT affiliate institutions and should not be entered.
- Broad Institute: Broad Institute authors will be entered as a MIT Authors only when the published date of a submission is prior to July 1, 2009. Some Broad authors are affiliated with MIT's Biology Department. In that case, enter only the Biology affiliation.
- If an author published a work prior to being affiliated with MIT and there are not any MIT authors in the article being reviewed, the article cannot be accepted into the Open Access Collection. See Section 3 for instructions on how to reject an item
- When the DOI is missing or the import function fails due to the size of the author list, only add the MIT authors.
- If there is a name for a collaborative group (example: LIGO Scientific Collaboration) then add the name of the group to the end of the author list.
- Specific instructions for Non-MIT Authors:
- How to add an MIT author name:
- Enter the last and first names and click lookup.
 Image Modified Image Modified
2. A search window should appear with search results. Select the most complete author record for the author associated with the article. Click add this author.
 Image Modified Image Modified
3. Confirm adding the MIT author to the record by clicking add.  Image Modified Image Modified
|
| Expand |
|---|
| Confirm the title of article or book chapter by checking that it matches the title of the item being submitted A title may need to be edited if it contains symbols and subscript/superscripts. Often a symbol-free title can be copied and pasted from the publisher-provided citation. When a symbol-free title cannot be found in the publisher-provided citation, any diacritics, symbols, and scientific notations can be entered by cutting and pasting (visit http://www.fileformat.info/info/unicode/index.htm for unicode characters) Most characters can be added into the title field with the exception of some superscripts and subscripts. DSpace does not currently support decimal numbers, percentages, mathematical symbols or letters in superscript and subscript form. Instead they are typed into the title as either [superscript #] or [subscript #].
 Image Modified Image Modified
|
|
|
...
| Expand |
|---|
| title | 2.2.2.6 Title (as published) |
|---|
| Enter only if the final published version of the item has a different title than the version being submitted to DSpace. A title may need to be edited if it contains symbols and subscript/superscripts. Often a symbol-free title can be copied and pasted from the publisher-provided citation. When a symbol-free title cannot be found in the publisher-provided citation, any diacritics, symbols, and scientific notations can be entered by cutting and pasting (visit http://www.fileformat.info/info/unicode/index.htm for unicode characters) Most characters can be added into the title field with the exception of some superscripts and subscripts. DSpace does not currently support decimal numbers, percentages, mathematical symbols or letters in superscript and subscript form. Instead they are typed into the title as either [superscript #] or [subscript #].
 Image Modified Image Modified
|
|
|
...
...
This field is where the title of the journal is imported or entered. There are several scenarios listed below along with instructions on how to use the journal field in each scenario. DOI Provided DOI Missing or Incorrect Confirm the title by checking the publisher page and article pdf. Do not use articles at the beginning of the journal titles. Enter the name of the journal that has published or will be publishing the item into DSpace.
Article Submitted but not yet Published Book Chapters - When cataloging a book chapter add the book title as the journal title.
 Image Modified Image Modified |
| Expand |
|---|
| title | 2.2.2.8 Journal Volume |
|---|
| If the journal volume number information is readily available add it to this field, otherwise leave the field blank.
 Image Modified Image Modified |
| Expand |
|---|
| title | 2.2.2.9 Journal Issue |
|---|
| If the journal issue number information is readily available add it to this field, otherwise leave the field blank.
 Image Modified Image Modified
|
|
|
2.2.2.10 Publisher
Use OCLC or Worldcat to find the appropriate form of the publisher name by searching for the journal title if the Publisher field is not populated with a metadata value or has an error in the publisher name. Then enter the name of the publisher in the record.
...
